A Case for MacVLAN Docker Networking with Unifi
Unifi’s monitoring data and network management capabilities are widely recognized, especially in home lab environments. However, when it comes to Docker networking, the default bridge network can sometimes be limiting, particularly for applications that require direct access to the network or need to be isolated from other containers. The data that the containers generate can be significant when it comes to diagnostics and monitoring. You can use services like Grafana and Prometheus to visualize this data, but you will lose out on the Unifi ecosystem capabilities. In order to get docker containers to behave nicely, I would need a solution that allows each docker container to have its own MAC address and appear as a separate device on the network. This is where MacVLAN networking comes into play.
Background on Docker Networking Drivers
Docker provides several networking driver options including bridge, host, none, overlay, ipvlan, and macvlan. Each of these drivers serves different use cases:
- Bridge: The default driver, which creates a private internal network on the host system. Containers can communicate with each other but are isolated from the host network.
- Host: Removes network isolation between the container and the Docker host, allowing the container to share the host’s network stack.
- None: Disables all networking for the container.
- Overlay: Used for multi-host networking, allowing containers on different Docker hosts to communicate.
- MacVLAN: Allows containers to have their own MAC addresses, making them appear as separate devices on the network.
- IPVLAN: Similar to MacVLAN, it allows containers to have their own IP addresses but shares the host’s MAC address.
Use Case for MacVLAN in Home Lab Environments
In the case of my homelab and wanting to see each of the containers as separate devices on the network, MacVLAN is the most suitable option. It allows each container to have its own MAC address, allowing for monitoring and data collection on the unifi controller that is specific to that container rather than the host itself. While this can be beneficial for monitoring and diagnostics, it also created a lot of headaches when it came to configuring the other networking components in my home lab.
This post explores the benefits of using MacVLAN networking in Docker, particularly in environments with Unifi devices.
Setting Up MacVLAN Networking
To set up MacVLAN networking in Docker, you need to create a MacVLAN network and then attach your containers to it. Here’s a step-by-step guide:
Create a MacVLAN Network: Use the following command to create a MacVLAN network. Replace
eth0with your actual network interface.docker network create -d macvlan \ --subnet="192.168.1.0/24" \ --gateway="192.168.1.1" \ -o parent=eth0 \ macvlan_networkRun a Container with MacVLAN: Use the following command to run a container on the MacVLAN network. Replace
my_containerwith your desired container name.docker run -d --name my_container \ --network macvlan_network \ --ip="192.168.1.100" \ my_imageVerify the Container’s Network Configuration: You can verify that the container is using the MacVLAN network by checking its IP address and MAC address.
docker exec my_container ip addrThe output should show the container’s IP address and MAC address, which should be different from the host’s.
3: eth0@if3: <BROADCAST,MULTICAST,UP,LOWER_UP> mtu 1500 qdisc noqueue state UP group default qlen 1000
    link/ether 02:42:c0:a8:01:64 brd ff:ff:ff:ff:ff:ff
    inet 192.168.1.100/24 brd 192.168.1.255 scope global eth0@if3
       valid_lft forever preferred_lft forever
Monitor with Unifi: Once the container is running, it should appear as a separate device in your Unifi controller, allowing you to monitor its traffic and performance.
Here is an example of how the container might appear in the Unifi controller:
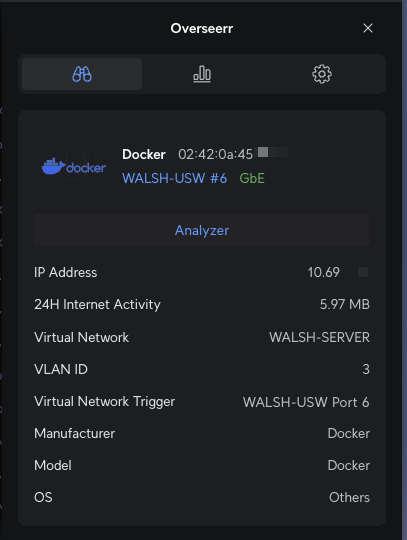
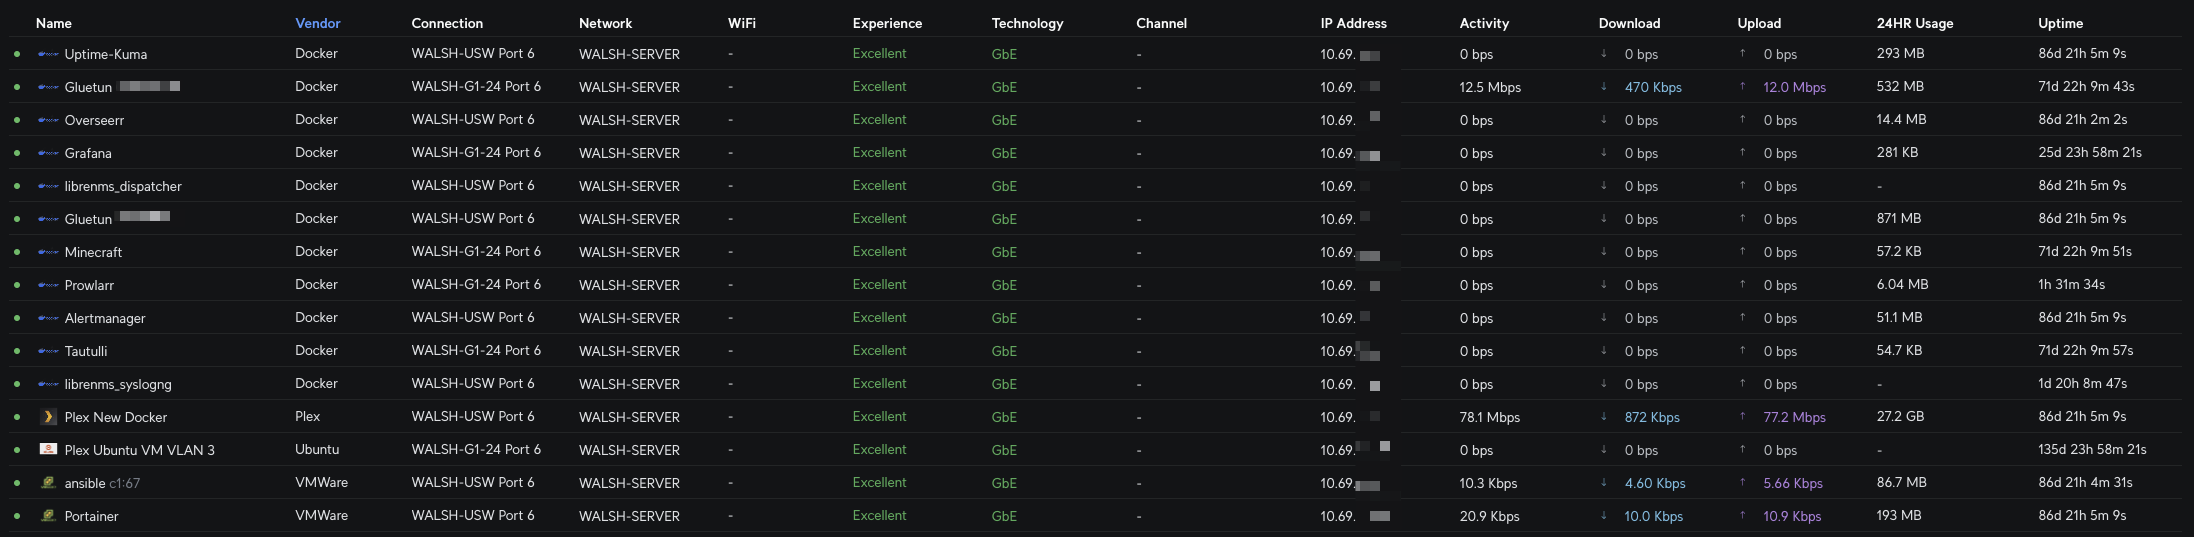
And here is an example of the traffic generated by the container:

Now applying this for each of the containers that I run in my home lab, I can see each of them as separate devices in the Unifi controller. This allows me to monitor their traffic and performance, and also apply specific firewall rules or QoS settings to each container if needed. It is interesting to see the type of traffic each docker container generates as well as uptime statistics. It is also useful to see the docker host thats running the containers separate from the containers themselves.
Technical Challenges and Considerations
While MacVLAN networking offers many benefits, it also comes with some challenges and considerations:
- Docker Host Networking: The Docker host must be configured correctly to allow MacVLAN networking. This for me involved setting up policy based routing on the VM, enabling promiscuous mode on the network interface, and ensuring that the virtual switch on the hypervisor was configured for the correct VLAN tagging. Gettting this working correctly took a lot of trial and error, and I had to do a lot of research to figure out the correct configuration for my specific setup. There is also not a lot of documentation on macvlan networking so it was a lot of reverting of VM snapshots until I got it working correctly.
- Network Complexity: MacVLAN can introduce additional complexity to your network configuration. Each container appears as a separate device on the network, which can make interacting with other docker plugins more complex. Sepecifically when learning about Grafana and Loki, I have issues with the Loki plugin not being able to connect to the Grafana container when using MacVLAN networking. This is because the Loki plugin is trying to connect to the Grafana container using the host’s IP address, which does not work with MacVLAN networking. I am still experimenting with getting the network to correctly route the traffic between the containers and the host. This is a known issue with MacVLAN networking, and there are several workarounds that can be used to resolve it. One of the workarounds is to use a reverse proxy to route the traffic between the containers and the host.
Conclusion
MacVLAN networking in Docker provides a powerful way to manage and monitor containers in environments with Unifi devices. By allowing each container to have its own MAC address, it enables detailed monitoring and diagnostics that are not possible with the default bridge network. While there are some challenges and complexities involved in setting up MacVLAN networking, the benefits it offers in terms of visibility and control make it a compelling choice for home lab environments. When describing this project to my colleagues, many of them asked “why go through all that trouble?” My initial response was “Why not?”. I wanted to see if I could get it working, and I did to some extent but I am quickly seeing the limitations of MacVLAN networking in Docker. Unless I want to add another layer of complexity to my network, I will likely not be using MacVLAN networking in the future. However, it was a great learning experience and I now have a better understanding of how Docker networking works and how to troubleshoot networking issues in Docker. For the purposes of viewing container traffic its best to just use the industry standards like Grafana and Prometheus with the docker plugin. This will allow you to monitor your containers without having to worry about the complexities of MacVLAN networking.